Tags
children's parties, children's party, children's party planning, craft supplies, crafts, event planning, Gringott's, harry potter, Harry Potter class signs, harry potter party, Harry Potter Signs, Hogwarts Express Sign, party, party planning, spray paint, stencils, Weasley's Wizard Wheezes
This is the first post of some of the signs I’m doing for the party. I’ve only finished some of them so far but I have a few more planned so I will be posting them later once I get them finished.
These first few are pretty straight forward.
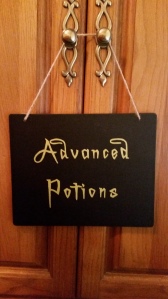
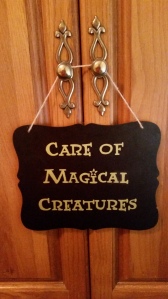
I purchased the chalkboard looking signs from Walmart and then found stencils or appropriate fonts with which to trace out the words onto the signs.
For the fonts, I printed them to the size I wanted them for the signs and then used a pencil to shade the back of the font paper. Then I used a bit of painter’s tape to hold the font paper in place on the chalkboard and used the pencil to trace the letters. The pencil shading on the back transferred to the sign as I traced and then I colored it in with a gold paint marker. The stencils I just used, like, well, stencils.
I picked these classes because I have fun activities to go with each of them for the party, but you could also use them as decorations at a party without doing an activity with it.
Hogwart’s Express
Next, is my Hogwarts Express Sign. This one took some time to do, mostly because it involved a number of coats of paint and finding the right lettering. I started with a board I bought at Joann’s. They have precut craft boards back in their section that has all the wood craft items.
I started with a primer paint for a base, the craft wood really soaks up the paint so I highly recommend a cheap primer paint first. Then I did a few coats of the deep red until I got it to the shade I liked.
The Hogwarts crest I printed out on paper. I didn’t use card stock because I didn’t want it to be too thick so as to make it look like it wasn’t just painted on to the board. I cut it out with my Exacto Knife and then Mod Podged (yes, I love using Mod Podge as a verb) it to my board in the upper left corner.
The hardest part was finding the letters and a good file for the 9 and 3/4 circle. I scoured the internet and just could not find a clean copy of a printable file. So I went old school. I pulled out my Roku projector and hooked it up to my laptop. I found a picture of a screenshot of the sign from the movie. I set my red board and my projector up so it was the right size and traced the letters and numbers with a pencil. Then I went back and painted them in.
The white circle took a crazy number of coats to cover the red so if it’s at all possible for you, leave that part white when you paint the rest of the sign. It will save you a lot of hassle and time spent waiting for paint to dry so you can do yet another coat.
For the gold trim, I used painter’s tape to mark where the gold strips would be and then painted those. I wanted nice clean lines and the tape really gave me that. Then when it was all dry, I did a couple coats of sealer spray paint (high gloss) just to make sure that paint wasn’t going anywhere. I tested it on the back first just to make sure the spray paint wouldn’t look bad. Just be very careful when spraying it, you don’t want to over-saturate it.
Weasley’s Wizard Wheezes
The next sign I did was just because I saw it and loved it so much I had to do it. Though I will have some Weasley’s Wizard Wheezes props there for decoration, it will probably just be mixed in with some other décor. I won’t have room to do a whole separate “shop” set up. But still, this sign, I loved it and had to make it.
 The Weasley twins are my favorite characters in HP. I think it’s because I have twin fellas who can be rather mischievous. For the sign, I printed off the picture I saw online. You can google Weasley’s Wizard Wheezes and I’m sure this picture will come up in your search.
I made the print-out the size of my craft board and used painter’s tape to tape it in place. Then I used a pen to trace the picture, being sure to press really hard. The craft wood is nice and soft so it took the lines really well. If I had it to do again, I think I would have tried to prime it before I traced it. (Although I’m not sure if I would have been able to see the indents then or not.) Like I mentioned earlier, this kind of wood really soaks up the paint. It took a ridiculous number of coats to get it to the shade I wanted. But it turned out really well and I absolutely love it!
I found some amazing print-outs and ideas for some Wizard Wheezes but I will be showing you those in another post.
Gringott’s Engraved Sign
The last sign I will be showing you today is the Gringott’s Sign I made. This took me for…ev…er… to make. I loved the poem from the Gringott’s bank and wanted to do my own “silver engraved sign” for my Gringott’s display at the party. So I found a cool font and sized it to fit my craft board and printed it out. I taped it on with painter’s tape and traced it with a pen, pressing hard like I did for the Weasley’s sign.
Then came the time consuming and difficult part. I used my wood burner to trace the indents I’d made with my pen. It was slow going let me tell you. And I kept tipping the burner too far and accidently burning places I didn’t want burned so I would have to sand it down a bit and keep going. It definitely tried my patience and at one point the burner slipped and I stabbed myself in the thumb. The only good news was that the burning hot tip instantly cauterized my deep puncture wound so it didn’t bleed all over my project. I would have been ticked! But I did find it prudent to go get a tetanus shot and a round of antibiotics when it looked like the wound started to get infected.
 After the wood burning was finished, I painted it with metallic silver to make it look like it was engraved and I was finally done!
I love it now that it’s done, but I wouldn’t do it again that’s for sure!
Well that does it for this post. I will be doing another post for the signs I will be doing from Diagon Alley and Hogsmede in the future so keep an eye out for that!


These look so cool! Will you post about the activities you have planned for each classroom?
Jess
>
LikeLike
I can certainly do that, it might not be until after the party just so I can get some pics to go with it. 🙂
LikeLike